How to Organize Donation Receipts Throughout the Year
When tax season arrives, organizing donation receipts can save you time, money, and stress. The IRS requires specific documentation for charitable contributions, especially for donations of $250 or more. Misplaced or incomplete records could cost you deductions or even trigger penalties. Here’s how to stay organized year-round:
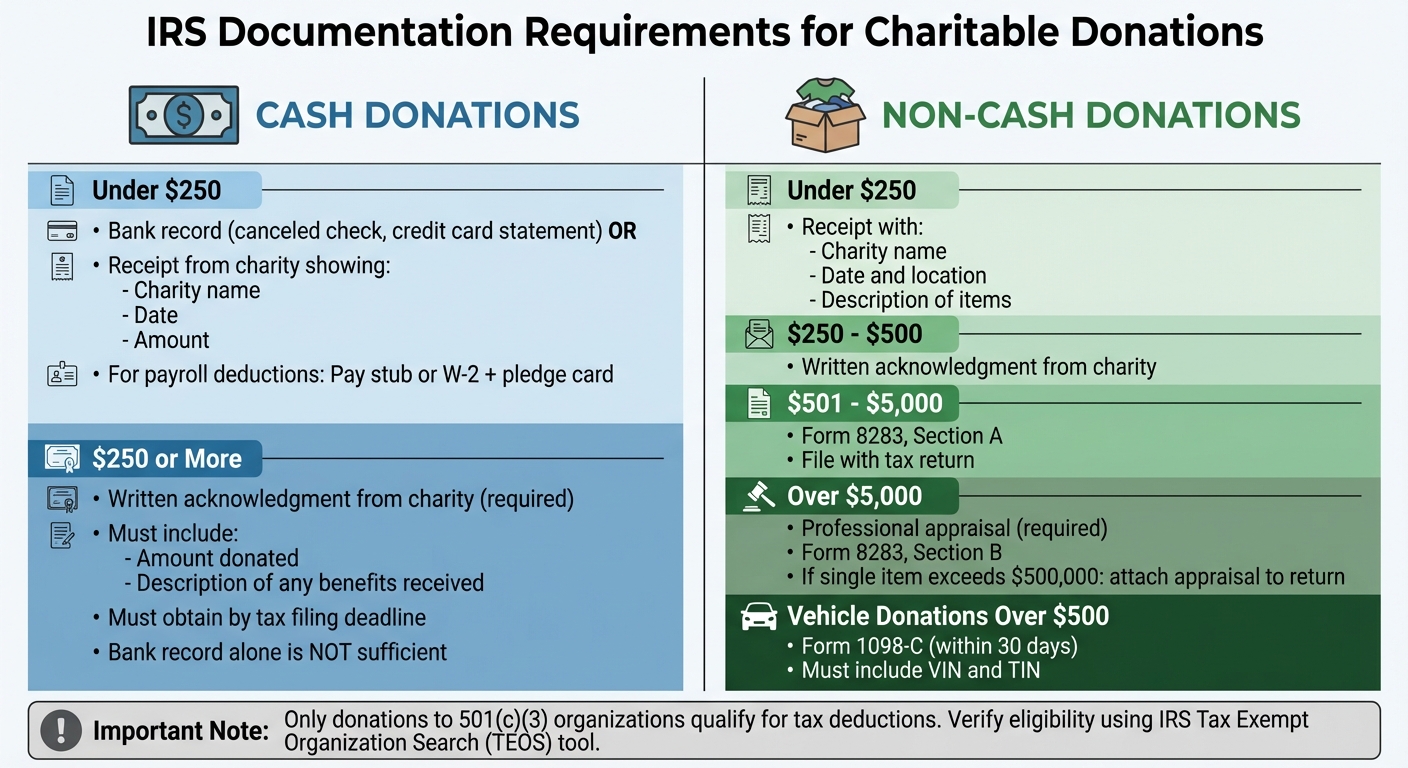
- Know IRS Rules: Cash donations under $250 need a bank record or receipt; those $250+ require written acknowledgment from the charity. Non-cash donations have stricter requirements, including appraisals for items over $5,000.
- Track Donations Monthly: Record details like the date, charity name, amount, and payment method as soon as you donate.
- Choose a System: Use digital tools, physical folders, or a mix of both. Name files clearly (e.g., "CharityName_2026-01-15_$500") and back up digital records.
- Organize by Thresholds: Separate receipts by cash vs. non-cash and by IRS-required thresholds ($250, $500, $5,000+).
- Review Quarterly: Reconcile donation logs with bank and credit card statements to ensure accuracy.
Consistency is key. Whether you prefer digital apps or paper binders, a structured approach ensures you're prepared for tax filing and potential audits. Simple habits like monthly updates and clear categorization make all the difference.
The Tax Documentation You Need for Charitable Donations
IRS Requirements for Charitable Donations
IRS Documentation Requirements for Charitable Donations by Amount
The IRS has clear rules about documenting charitable donations, and these vary depending on the type and amount of your contribution. Knowing these requirements ahead of time can save you from scrambling for paperwork when tax season rolls around. Here's a breakdown of what you need to keep based on the kind of donation you make.
Cash Donations: What You’ll Need for Proof
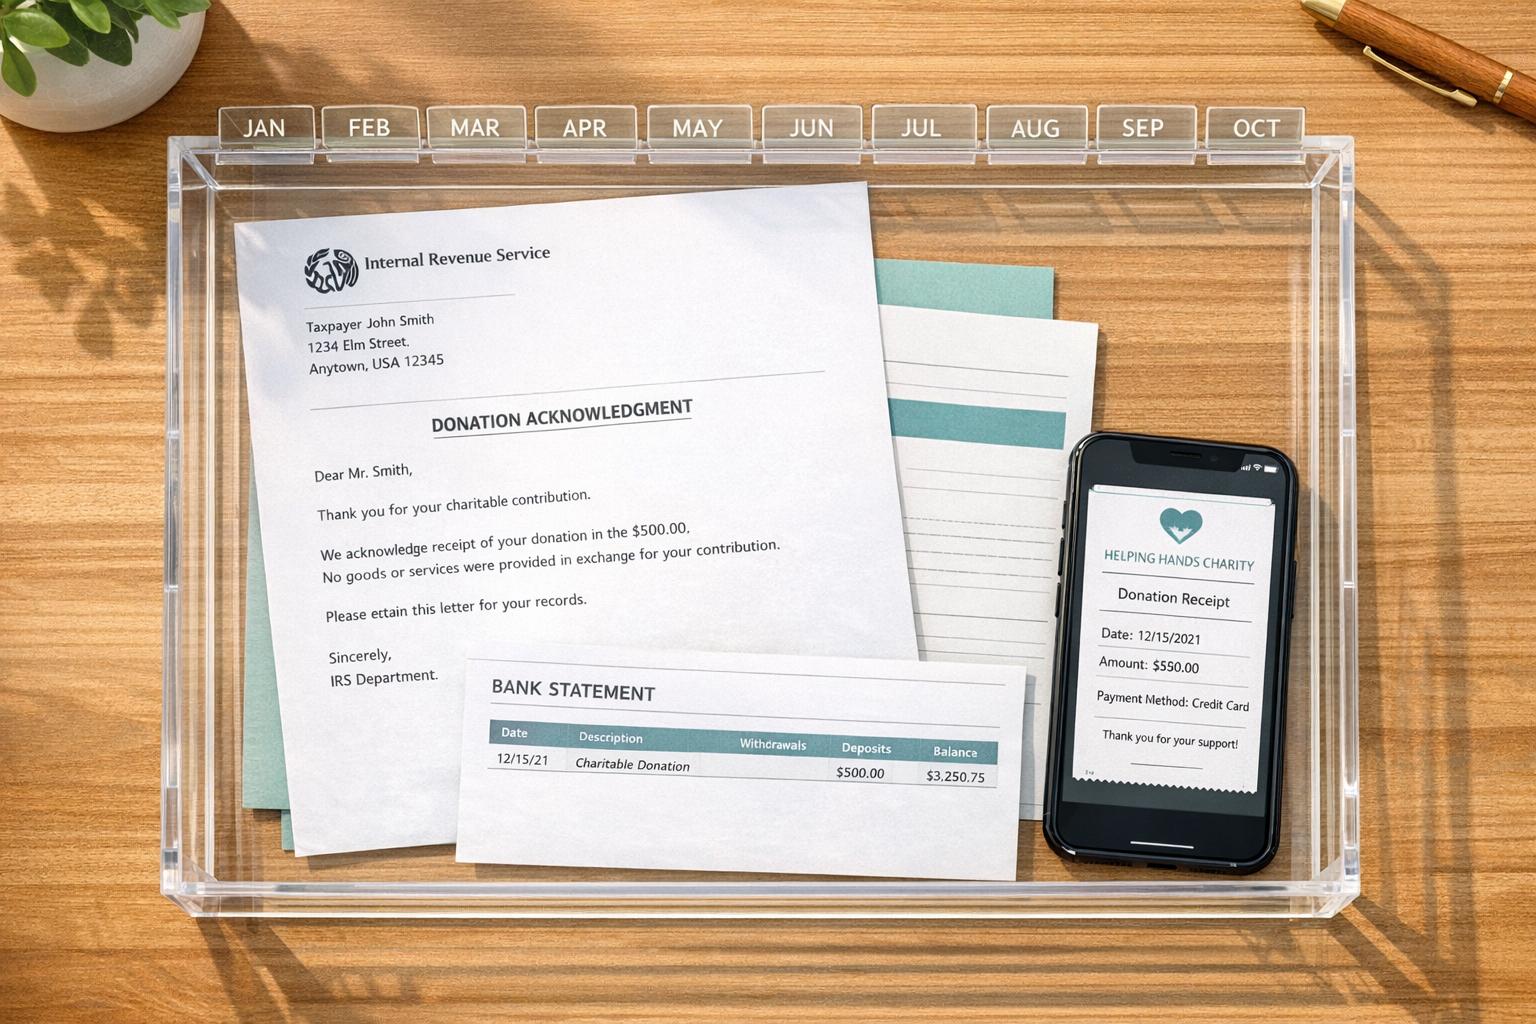
For cash donations under $250, you’ll need either a bank record (like a canceled check or credit card statement) or a receipt from the charity. The receipt should include the charity’s name, the date, and the donation amount. If you’re giving through payroll deductions, hold onto your pay stub or W-2 along with the charity’s pledge card.
For donations of $250 or more, a simple bank record isn’t enough. You’ll need a contemporaneous written acknowledgment from the charity. This document must specify the amount donated and describe any benefits you received in return. Make sure you have this acknowledgment by the time you file your tax return or by the filing deadline, including extensions.
Non-Cash Donations: Documentation Rules by Amount
Non-cash contributions come with their own set of documentation requirements, which depend on the donation’s value:
- Under $250: A receipt that includes the charity’s name, the date, location, and a description of the donated items is required.
- $250 to $500: You’ll need a written acknowledgment from the charity.
- $501 to $5,000: File Form 8283, Section A, with your tax return.
- Over $5,000: You’ll need a professional appraisal and must complete Form 8283, Section B. If the value of a single item exceeds $500,000, attach the appraisal to your tax return.
Keep in mind that the IRS considers the total value of similar items donated throughout the year, even if given to multiple charities.
"The IRS may disallow your deduction for noncash charitable contributions if it is more than $500 and you don't submit Form 8283 with your return." - Taxpayer Advocate Service
Qualified Charitable Organizations
It’s not just about keeping the right records - you also need to ensure your donations go to eligible organizations. Only contributions to entities with 501(c)(3) status qualify for tax deductions. These organizations are dedicated to religious, charitable, scientific, literary, or educational purposes. Donations made to individuals or groups without this status won’t count.
"GoFundMe and other types of social media requests are generally not tax deductible unless made to an approved charitable organization." - Taxpayer Advocate Service
To confirm an organization’s eligibility, use the IRS Tax Exempt Organization Search (TEOS) tool. Look for "Pub. 78 Data" to check if the group is approved to receive tax-deductible contributions. The tool can also tell you if a charity has lost its tax-exempt status due to missing required annual filings. Remember, while some nonprofits like labor unions (501(c)(5)) or social clubs (501(c)(7)) are tax-exempt, donations to them generally don’t qualify as charitable contributions.
How to Set Up a Receipt Tracking System
Setting up a receipt tracking system is all about keeping your records accurate, complete, and easy to manage. The trick is to choose a method that aligns with your donation habits and stick to it consistently throughout the year. Let’s break down how to make this work and what details you’ll need to track.
First, decide whether you’ll manage your receipts digitally, physically, or a mix of both. Digital systems are great for frequent donors or anyone who prefers searchable records. On the other hand, physical filing might feel more intuitive if you like having hard copies. Many people find a hybrid system works best: scan paper receipts for digital storage but also keep the originals neatly organized in a labeled binder. This approach pairs well with monthly tracking habits, making it easier to stay on top of your records. Just make sure to integrate your receipt sorting into your overall record-keeping routine.
No matter the method, your system needs to capture five key details for every donation:
- The date of the donation
- The charity’s name (including its EIN)
- The dollar amount or a description of the donated item
- The payment method
- A copy of the receipt or acknowledgment
For digital systems, use consistent file naming conventions to make searching easy. For example: Charity/2026/Red Cross - 01-15-2026 - $500. If you prefer physical records, a 1 to 3-inch binder with sheet protectors and labeled dividers can keep everything neat. Alternatively, accordion folders (starting around $7.99) are a budget-friendly option.
To avoid missing anything, perform quarterly reconciliations. Compare your donation log with bank and credit card statements to ensure all contributions are accounted for. For recurring donations, set up a dedicated digital folder to store those receipts. If you want to streamline things even further, financial tools like QuickBooks or Mint can help tag charitable gifts directly from your bank feeds, cutting down on manual work.
"Tracking charitable donations is a practical, year‑round habit that preserves tax benefits and reduces audit risk." - FinHelp.io
Digital vs. Physical Record-Keeping
When it comes to storing receipts, the choice between digital and physical methods depends on factors like durability, ease of access, and personal preference. The IRS accepts both scanned and paper receipts as valid documentation for tax purposes, so the key is to pick a system you can stick with consistently throughout the year [2]. This builds on the receipt tracking strategies mentioned earlier.
Digital storage offers some undeniable advantages. With tools that allow instant receipt capture, keyword searches, and automated bank reconciliation, managing records becomes much easier [3]. Digital files don’t fade, tear, or get misplaced and can be accessed anytime from your smartphone. To safeguard against hardware failure, make sure to back up your files to a secure cloud service or an external drive [10]. This approach not only simplifies tax filing but also ensures compliance with IRS documentation standards.
On the other hand, physical records come with their own challenges. Paper receipts are prone to loss, damage, or fading over time [10]. While using color-coded folders can help you organize receipts by category with minimal effort, manually sifting through them is far less efficient than typing a keyword into a search bar.
"While you'll want to hold onto paper receipts to document your expenses, a receipt can get lost or damaged, or even fade over time." - TurboTax Expert [10]
For the best of both worlds, consider a hybrid system. Scan your paper receipts to create digital backups while keeping the originals neatly organized in labeled binders. This way, you get the searchability of digital records along with the reliability of physical copies. If you’re making the switch from paper to digital, use a consistent naming convention - like "Red Cross - 01-15-2026 - $500" - to make finding specific receipts a breeze [3].
What Information to Track on Each Receipt
Every receipt for a charitable donation should include the charity's legal name, your name, and the donation date - this means the postmark date for checks or the authorization date for credit card transactions.
For cash donations, make sure the receipt specifies the exact dollar amount. For non-cash donations, the receipt should describe the items donated (e.g., "three bags of used clothing" or "100 shares of Apple stock"). However, the charity should not assign a value to these items. Missing any of these details could result in the IRS rejecting your deduction.
"The IRS has been taking a harsh approach over the past few years and disallowing charitable donations simply due to the receipt not containing the required information" [11].
Receipts must also include a goods and services statement. If you didn’t receive any benefit in return for your donation, the receipt should state: "No goods or services were provided." If you did receive something in return, such as a ticket to a gala dinner, the receipt must list the estimated fair market value of that benefit.
For vehicle donations over $500, the receipt (or Form 1098-C) must include your Taxpayer Identification Number, the Vehicle Identification Number, and details about how the charity either used or sold the vehicle. If the only benefit you received is an intangible religious one, the receipt should explicitly state that.
Whether you keep your receipts digitally or on paper, ensure that each one includes the charity's name, the date of the donation, and either the dollar amount or a detailed description of the donation. Regularly reviewing your receipts throughout the year can help you stay organized and make tax preparation much smoother.
sbb-itb-e723420
Tips for Keeping Records Organized
Keeping your donation receipts organized makes tax preparation smoother and less stressful. Start by setting up a dedicated folder - either physical or digital - just for donation records. This keeps them separate from other tax documents and easier to manage. For digital files, try using a clear folder structure like ~/Taxes/2025/Charity/ to make everything easy to locate at a glance.
Choose one method of organization and stick to it. Whether you prefer sorting by date or by charity, consistency is key. Mixing methods can lead to confusion when you’re trying to track down specific receipts. Keeping tax-related documents in their own space will save you time when it’s time to file.
Make digital files searchable with standardized naming. Use a simple format like "Red Cross - 2025-03-15 - $500" to include the charity name, date, and donation amount. For physical records, color-coded folders or labeled envelopes can help you quickly tell donation receipts apart from other paperwork.
Back up your digital records regularly. This protects you from losing important files due to hardware failures, lost devices, or even fading paper receipts. Use reliable cloud storage solutions like Dropbox or Google Drive, and keep an offline backup on an external hard drive. The IRS accepts scanned receipts as long as they’re legible and include all the necessary details.
Set aside 15 minutes each month to update your records. During this time, jot down any relevant notes directly on the receipts - like the purpose of the donation - while the details are still fresh in your mind. This habit ensures you have all the context you need when tax season rolls around, and it helps you stay on top of your records year-round.
How to Organize Donations by Category and Amount
Keeping your donation receipts organized by IRS-required thresholds can make tax filing much smoother while ensuring compliance. Building on your receipt tracking system, sorting donations by amount simplifies the process of matching records and filing taxes.
Cash Donations: Under $250 vs. $250 and Above
Start by creating two folders for cash donations: one for amounts under $250 and another for donations of $250 or more. Label the first folder "Under $250 Cash Donations." For these smaller contributions, a bank record - such as a canceled check, bank statement, or credit card statement - showing the charity's name, date, and amount will meet IRS requirements [8].
For donations of $250 or more, you'll need a written acknowledgment from the charity [9][1]. A bank statement alone won’t suffice. The acknowledgment must include the charity’s name, the amount donated, and a statement clarifying whether any goods or services were provided in return. Label this folder "Formal Written Acknowledgments" and ensure each receipt meets these criteria as soon as you receive it.
If you're donating through payroll deductions, keep pay stubs or W-2 forms along with the pledge card [8]. For credit card donations, remember that contributions made before December 31 count for that tax year [8].
Once your cash donations are sorted, apply a similar system to your non-cash contributions based on their documented values.
Non-Cash Donations: Grouping by Value
Non-cash donations require specific documentation depending on their value. Create four folders to align with IRS thresholds:
- Under $250: Include a receipt from the charity or a reliable written record that notes the charity's name, the date, the location, and a detailed description of the donated items.
- $250–$500: Obtain a written acknowledgment that specifies whether you received anything in return for your donation.
- $501–$5,000: Attach Form 8283, Section A, and keep records showing when and how you acquired the property and its cost basis.
- Over $5,000: The IRS requires a qualified appraisal by a professional and the completion of Form 8283, Section B.
For vehicle donations over $500, make sure to get Form 1098-C within 30 days [7].
Whether you prefer digital folders or physical binders, label each category clearly for easy access. Keep in mind that clothing and household items generally need to be in "good used condition or better" to qualify for deductions [8]. Taking photos of donated items and holding onto original purchase receipts can help substantiate the fair market value you claim.
How to Stay Organized Throughout the Year
Once you've set up an organized system for receipts, keeping your records up to date becomes much easier. By sticking to a regular routine, you can avoid the stress of scrambling to gather everything during tax season.
Create a Monthly Tracking Routine
Set aside 15–20 minutes each month to review your donation records. Compare these records with your bank and credit card statements every quarter to ensure nothing is missing or inaccurate[3]. This habit not only helps you catch gaps while the details are still fresh but also gives you time to request duplicate receipts if needed.
"Establish a consistent schedule for reviewing your records each month, and always keep digital backups of important documents to safeguard against loss." - TaxSlayer [2]
By staying consistent, you'll have a solid system in place for accurate documentation and efficient tracking.
Immediately Request Documentation
For donations of $250 or more, it’s crucial to request a written acknowledgment right away[9]. Make it a practice to secure documentation immediately after donating - whether you’re dropping items off at a center or donating online. If your donation is through payroll deductions, hold on to both your pay stub showing the amount withheld and the original pledge card with the charity’s name[8]. For smaller cash donations under $250, your bank or credit card statement usually works[3], but make sure to take a photo of any paper receipts and save them digitally[2].
This proactive approach keeps your records complete and ready for tax filing.
Use Tools to Automate Tracking
Automation can save you time and reduce the risk of errors. Tools like Deductible.me simplify things with AI-powered photo scanning that values donated items and creates IRS-compliant reports. Their Premium plan, priced at just $2 per month, offers unlimited donation tracking, advanced receipt management, and even a feature to track your annual giving goals. If you donate regularly, this can be a game-changer. For recurring monthly donations, set up automated email receipts and archive them in a dedicated tax folder[3]. This ensures every contribution is logged effortlessly and ready when tax season rolls around.
How to Prepare Donation Records for Tax Filing
Getting your donation records in order now can make tax filing smoother and help protect your deductions.
Gather All Necessary Documentation
Start by collecting all your donation receipts, acknowledgments, and any required forms. For non-cash donations over $500, make sure to include Form 8283, and if the value exceeds $5,000, you'll need a qualified appraisal. For vehicle donations over $500, attach Form 1098-C. To ensure your donations are eligible, verify the charity's status using the IRS's Tax Exempt Organization Search (TEOS) tool.
Match Donations with Tax Deduction Limits
Separate your cash and non-cash donations, and compare them against your draft tax return. This step helps identify any discrepancies before you file. Remember, charitable deductions are subject to limits based on your adjusted gross income (AGI) and the type of gift. If you received a state or local tax credit exceeding 15% of your donation's value, you'll need to reduce your federal deduction by the credit amount. Also, for donations of $250 or more, ensure you have a contemporaneous written acknowledgment. Once everything checks out, securely store these records for future reference.
Organize Records for Audits
The IRS requires you to keep donation records - such as receipts, canceled checks, acknowledgments, and appraisals - for at least three years from the date you file your return. To stay organized, create a digital folder labeled with the tax year (e.g., "2026_Donations") and store all relevant documents there. If you use tools like Deductible.me's Premium plan, it can automatically archive your receipts and generate IRS-compliant reports, simplifying the process. Having well-organized records not only speeds up filing but also ensures you're prepared if the IRS requests documentation.
"Good recordkeeping can also help taxpayers understand their situation when they receive letters or notices from the IRS." - Internal Revenue Service
Conclusion
Staying on top of your donation receipts doesn't have to be a hassle if you follow IRS guidelines and stick to a consistent tracking system. Start by setting up a straightforward method to organize your records - categorize your donations by type and amount, and you'll save yourself the headache when tax season rolls around. The secret? Consistency. Record the basics right away, review your records quarterly, and make sure to request acknowledgments for any donations of $250 or more before filing your return.
Keeping your records in order not only maximizes your deductions but also ensures you're prepared in case the IRS asks for documentation. Plus, with the 2026 tax rule allowing non-itemizers to deduct up to $1,000 (or $2,000 for joint filers) in cash contributions, even smaller donations can make a difference for every taxpayer [6].
For most people, a mix of tools works best. Use automated systems like bank feeds or brokerage statements to capture transactions, and pair them with a simple spreadsheet to track notes and unique items. For non-cash donations, snap a photo on the day you give - this provides proof of the item's condition and helps establish its fair market value. These small steps can save you from penalties or disputes later on.
Make it a habit to keep donation records for at least three years to stay audit-ready [4][5]. Create a digital folder labeled by tax year (e.g., "2026_Donations") for easy access. Tools like Deductible.me's Premium plan can simplify the process even further by generating IRS-compliant reports and storing your receipts, so you're always prepared when it matters most.
FAQs
What records do I need to keep for cash and non-cash donations to meet IRS requirements?
To meet IRS requirements, it’s essential to maintain detailed records for both cash and non-cash donations.
For cash donations, you can use bank statements, canceled checks, or written acknowledgments from the charity as proof. If you donate $250 or more in a single contribution, the charity must provide a written acknowledgment. This document should confirm the donation amount and state whether any goods or services were received in return (or specify their value if applicable).
For non-cash donations, proper documentation is just as important. This includes receipts from the charity describing the donated items. For higher-value donations, particularly those exceeding certain thresholds, you may need an independent appraisal. Be sure to document the fair market value of the items and keep all related paperwork.
To make tax season easier, consider organizing these records throughout the year. Whether you choose digital storage or physical filing, staying on top of your documentation can save you a lot of hassle later.
What’s the best way to organize donation receipts for tax season?
To keep things running smoothly all year and make tax season less of a headache, create a reliable system for organizing your donation receipts. Start by sorting them right away - use clearly labeled physical folders or a digital filing system to keep everything in order. If you prefer a paper-free approach, tools like receipt scanning apps can help you securely store and manage records while cutting down on clutter.
Make sure to hold onto all necessary documents, including receipts, bank statements, acknowledgment letters from charities, and appraisals for non-cash donations. These records will not only make filing taxes easier but also help you meet IRS requirements. By updating and reviewing your records regularly, you’ll save yourself a lot of time and make the most of your charitable tax deductions when tax season rolls around.
What should I do if I didn’t get a written acknowledgment for a donation over $250?
If you've made a donation of $250 or more and didn’t receive a written acknowledgment, it’s crucial to contact the charity promptly to request one. The IRS requires this documentation for you to claim a tax deduction for contributions at or above this amount.
In cases where you can't obtain the acknowledgment, you might have to rely on other records, like canceled checks or bank statements. However, these may not always satisfy IRS requirements. To prevent any complications down the road, make it a habit to request and save written acknowledgments as soon as you make your donation.